Selenium WebDriver Page Object Model Framework Introduction

Page Object Model Framework in Selenium WebDriver has come to be very popular Selenium WebDriver test automation framework in the software industry and many IT companies are following this framework because of its easy to write test scripts, Test script maintenance and reduces the duplication of code.

The main merit of Page Object Model in Selenium WebDriver is that if the Web UI changes for any module pages, it don’t require to change any Selenium WebDriver Test Scripts, we just need to change only the Test Page code within the page objects. 


Page Object Model in Selenium WebDriver


Example:


public class LoginPage{

public static WebDriver driver;
private By pageTile = By.xpath("//input[@title='Selenium WebDriver']");
private By homePage=By.id("home");
private By singInPage=By.id("login");
private By uname=By.id("userName");
private By password = By.id("password");

}


In the above code, we've identified the Element locators and defined in the after the class. In this way we can achieve readability of test scripts and we can easily identify Web Element locators and change the Element Locators as per required only in page object classes.
Page Object model in Selenium WebDriver is useful in preparing the AUT functionalities or Reusable components of a Webpage which we want to automate in a separate Test class. Let’s consider as Login Page.

As per Selenium WebDriver ORG Page Object Model is


"Within your web app’s UI there are areas that your tests interact 
with. A Page Object simply models these as
objects within the test code.This reduces the amount of duplicated code
 and means that if the UI changes,the fix need only be applied in one place."

For the above page I’m creating simile class as LoginPage.class. In this class we’ll write reusable methods to call in another class to implement the Test cases.

Let’s consider entry page as Bing Search Page which will have many options like Search, Sign In, Images, Videos, Maps, News Languages, MSN, Outlook.com links. Here as per user action it will navigates to respective web pages to achieve this all functionalities that we want to automate should have reusable methods/components for each web-page.

Now as our main Entry Page is Bing Home page user can navigate to respective pages by clicking on any link from the Bing Search page. Whenever users are navigating to respective pages, we have to return particular page objects. Otherwise Return the current page object as this action doesn't navigate to another page signified by another Page Object.

The Page Object model advantages.

1. Clean Code between test code and page specific code such as locators and layout.
2. Single Object Repository for all functionalities, No Duplication of codes.

In above situation this allows you to perform modifications only in UI because of CR in current requirements or changes in UI Designs.

As per Selenium WebDriver WIKI Page

There is a PageFactory in the support package that provides support for this pattern, and helps to remove some boiler-plate code from your Page Objects at the same time.

Page Object Model in Selenium WebDriver Step by Step Guide

Page Object Model in Selenium WebDriver Projects has become crucial Automation Framework in different organization and many software Testers are implementing Selenium Page Object Model in their project why because it is easy to maintain Test Scripts, easy to understand the Test Execution, easy to maintain Page Object Repository and last but not least reduces the duplication of code.

Recommended Articles

  1. Write Test Cases PASS OR FAIL in Excel with SELENIUM
  2. Create Object Repository in Selenium Project.
  3. Page Factory Framework Implementation Examples.
  4. Start APPIUM server programmatically.


Page Object Model in Selenium WebDriver

The main advantage of Page Object Model in Selenium WebDriver is easy to maintain Page Objects, easy to avoid duplicate of Code. Duplicate code in Selenium cause duplicate of different Functionalities with this duplicate code which results in multiple time repetition of duplicate element locators. You will learn How to implement Page Object Model in Selenium using Simple Examples as explained below. In this examples I’m using simple Login.java class, so that you can implement for other classes in your Selenium Projects.

In this Page Object Model, you need to create two packages

One for Page Objects Second one for Page Test Cases Implementation as below example.

How to IMPLEMENT?

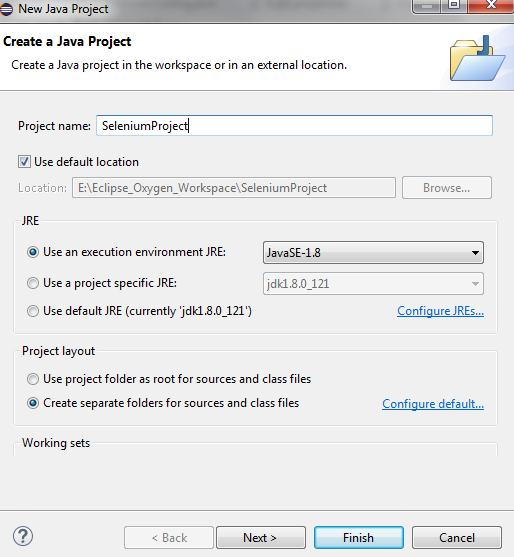
STEP 1: First Create JAVA Project
STEP 2: Configure required JAR files in Build Path
STEP 3: Create two packages under src folder
STEP 4: One Package for Page Object (Object Repository)
STEP 5: Second Package for Page Test Classes.


Login.java

Above class created under page Objects package and code will be as follows
package com.selenium.pageObjects; 
import org.openqa.selenium.*; 
import org.openqa.selenium.WebDriver; 
import org.openqa.selenium.WebElement;
 
public class LoginPage {
 
        private static WebElement element;
 
    public WebElement setUserName(WebDriver driver){
 
         element = driver.findElement(By.id("uName"));
 
         return element;
 
         }
 
     public WebElement setPassword(WebDriver driver){
 
         element = driver.findElement(By.id("password"));
 
         return element;
 
         }
 
     public WebElement clickOnSignin(WebDriver driver){
 
         element = driver.findElement(By.id("submit"));
 
         return element;
 
         }
 
}

WebDriver is being passed as a Method Arguments for each methods, so that Selenium is able to locate the Web Page elements on the specified browser using driver object. In above code element is returned, because method is not a void that is the reason we should return the values inside the method to use in another class or somewhere.so that an Action can be performed on elements. Method is declared as Public WebElement, so that method can be used in any other methods without instantiate the class.Now let’s create Page Test Case class under page Actions package as below for Login Page.

LoginTest.java
package com.selenium.Actions;
import java.util.concurrent.TimeUnit;
import org.openqa.selenium.WebDriver;
import org.openqa.selenium.firefox.FirefoxDriver;
import com.selenium.pageObjects.LoginPage ;

public class LoginTest {

     private static WebDriver driver = null;
 LoginPage login=new LoginPage();

//Main Method
   public static void main(String[] args) {

 System.setProperty("webdriver.gecko.driver","E:\\geckodriver\\geckodriver.exe");
     driver = new FirefoxDriver();
     driver.manage().timeouts().implicitlyWait(30, TimeUnit.SECONDS);
     driver.get("http://www.yourloginurl.com");

     // Use page Object library now

     login.setUserName(driver).sendKeys("rajesh_3434");
     login.setPassword(driver).sendKeys("makeindia");
     login.clickOnSignin(driver).click();

     System.out.println(" User Login Successfully,My Account screen is open");

      driver.quit();

     }

}


Now create testng.xml file to run your Test Actions classes as specified in your testng.xml file,Just right click on it and Run As – TestNG Tests. 

 You will see Test script Execution on Firefox Browser as provided login credentials. 

 Thank you for reading my blog ,Please share this post in case you feel informative and provide your valuable comments on this post.

Selenium Webdriver Using Python - Complete Tutorial Guide

Selenium supports Python language bindings and can be developed with Selenium Test Scripts for testing.

Python is easy matched to other programming languages, having extreme fewer verbose.
Python language is easy to learn and easy to write the scripts using Python Language.

The Python Language APIs enables you to link with the browser from end to end using Selenium.Selenium guides the standard Python commands to different browsers.

Selenium WebDriver Test Scripts can be run in different browsers and on different operating Systems such as


Firefox
Chrome
IE

What is Python?

Python is a high-level object oriented programming language or scripting Language with dynamic semantics. 


Selenium Webdriver Using Python - Complete Tutorial Guide


Selenium WebDriver Using Python - Complete Tutorial Guide

1.Python is a Simple Language
2.Easy to Learn
3.Easy to Read
4.Easy to Maintain


Sample Python Example:


print("Hello World!")
ready = True
if ready:
print("Hello World!")

Why to Choose Python Language in Selenium WebDriver

Below different points explains why Python language is better for Selenium WebDriver scripting, those are

1.Extensive Support Libraries
2.Open Source
3.Learning Ease and better Support
4.User Friendly Data Structure
5.Python uses indentation

Selenium WebDriver Python bindings provides a better API to write functional/acceptance test scripts using Selenium WebDriver. Through Selenium WebDriver Python API we can access all functionalities of Selenium WebDriver in a natural way.

Selenium WebDriver Python Concepts:

Download Python Bindings for Selenium WebDriver
Install Python Language.
Download Drivers for Browsers
First Selenium Python Script
Selenium Web Pages Interaction using Python
Locating Elements
Python Wait Commands
Selenium Page Objects
Selenium WebDriver API

How to Get HTML Source of WebElement in Selenium WebDriver using Python

How to Get HTML Source of WebElement in Selenium WebDriver using Python,While working with Selenium WebDriver scripting using any language bindings whether it is a Python,Java or Ruby,we require to verify Expected Results with Actual results to check Test case is PASS or FAIL.In this selenium WebDriver using python post you will learn Get HTML Source of WebElement in Selenium WebDriver using Python languages.


Get HTML Source of WebElement in Selenium WebDriver using Python


I'm using python bindings to create Selenium Webdriver Test scripts,till now you've learn Selenium Webdriver Test scripting with JAVA but coming to Python language it is completely different.

We can read WebElement source with the help of innerHTML attribute to get the Element Source of the Content.

Using chromeDriver to open Google Chrome Browser.

Different Language code to Get HTML Source of WebElement in Selenium WebDriver,Please use below different code to use in Selenium webdriver Test Scripts.

PYTHON:

element.get_attribute('innerHTML')


PHP:

$elem.getAttribute('innerHTML');


JAVA:

elem.getAttribute("innerHTML");


C#:

element.GetAttribute("innerHTML");


RUBY:

element.attribute("innerHTML")


JS:

element.getAttribute('innerHTML');

Selenium WebDriver Page Factory Model Examples

Page Factory Model is an inbuilt Page Object Model concept for Selenium WebDriver but Page Object Model is much optimized. In this Selenium WebDriver Page Factory Model Examples post you'll learn the concept of separation of Page Object Repository and Test Methods i.e. Test Cases Methods. Moreover, with the help of PageFactory class, we use annotations @FindBy to find Web Element and you can use initElements method to initialize web elements.

@FindBy can accept below attributes to identify the web Elements.
  • ID
  • NAME
  • CLASS NAME
  • PARTIAL LINK TEXT
  • TAGNAME
  • CSS
  • XPATH

We'll discuss above points with brief examples, let's look into below codes to understand How to Implement Selenium WebDriver Page Factory Model in selenium WebDriver Frameworks.
The Page Factory Class help us to write clean Java Code and Reusable Functions in Test Methods. By this Page Factory Model it is easy to code, Easy to understand the code or Test Cases and easy to understand the flow of the Test Cases execution.

Selenium PAGE FACTORY MODEL EXAMPLES

Selenium WebDriver Page Factory Model Examples

Follow below project folder structure to create Page Factory Framework in Selenium Projects. I'm creating three packages under project.
  • Com.selenium.portal.utility
  • Com.selenium.portal.pages
  • Com.selenium.portal.Tests
Step 1: Create JAVA project in Eclipse.
Step 2: Configure Selenium + Require JAR files using Configure Build Path.
Step 3: Add TestNG Library from Configure Build Path screen.
Step 4: Create Above three packages under src folder.

Now let's see each Packages Class Files, Create WebdriverInstance.java class under Com.selenium.portal.utility package, from this class we're using driver instance and Writing results to log using @AfterMethod method and taking screenshot for failed tests.

WebdriverInstance.java

package com.selenium.portal.utility;
import java.io.File;
import java.io.FileInputStream;
import java.io.IOException;
import java.lang.reflect.Method;
import java.util.Properties;
import org.apache.commons.io.FileUtils;
import org.openqa.selenium.Alert;
import org.openqa.selenium.Keys;
import org.openqa.selenium.OutputType;
import org.openqa.selenium.TakesScreenshot;
import org.openqa.selenium.WebDriver;
import org.openqa.selenium.firefox.FirefoxDriver;
import org.testng.ITestResult;
import org.testng.Reporter;
import org.testng.annotations.AfterMethod;
import org.testng.annotations.AfterTest;
import org.testng.annotations.BeforeMethod;
import com.aventstack.extentreports.ExtentReports;
import com.aventstack.extentreports.ExtentTest;
import com.aventstack.extentreports.Status;
import com.aventstack.extentreports.reporter.ExtentHtmlReporter;
import com.aventstack.extentreports.reporter.configuration.ChartLocation;

public class WebdriverInstance {

public static WebDriver driver;
public static ExtentReports extent;
public static Properties property;
public static ExtentHtmlReporter htmlReports;
public static ExtentTest test;
String fileName = System.getProperty("user.dir")+"/test-output/TestResults.html";

public void openBrowser() throws IOException {

property = new Properties();
FileInputStream orFile = new FileInputStream("E:\\Eclipse_Oxygen\\selenium\\OR.properties");
property.load(orFile);  

System.setProperty("webdriver.gecko.driver",property.getProperty("geckodriver"));
driver = new FirefoxDriver();

//ExtentReports details
htmlReports= new ExtentHtmlReporter(fileName);
extent = new ExtentReports();
extent.attachReporter(htmlReports);
htmlReports.config().setReportName("HYPERCITY REGRESSION TESTING");
htmlReports.config().setTestViewChartLocation(ChartLocation.TOP);


//Using extent set system information
extent.setSystemInfo("OS", "Windows 7");
extent.setSystemInfo("Browser", "Firefox 56V");
extent.setSystemInfo("Environment","QA");
extent.setSystemInfo("Server", "10.0.7.179");

}

//A Method provides information about, and access to, a single method on a class or interface
@BeforeMethod
public void afterMethod(Method results){
test=extent.createTest(results.getName());
test.log(Status.INFO, results.getName() + " Test is started");

}

@AfterTest
public void afterTest() {
extent.flush();
}

public String validatePageTitle() {  

return  driver.getTitle();
}


@AfterMethod
public void verifyTestResults(ITestResult results) {

if(results.getStatus()==ITestResult.FAILURE) {
test.log(Status.FAIL, results.getName() + " Test case is Failed because of below reason");
test.log(Status.FAIL, results.getThrowable());

}else if(results.getStatus()==ITestResult.SKIP) {
test.log(Status.SKIP, results.getName() + " Test Case execution is skipped because");
test.log(Status.SKIP, results.getThrowable());

}else {
test.pass(results.getName() + " Test Case is PASS");

}

}

public void takeScreenShot() throws IOException {

File screenShot = ((TakesScreenshot)driver).getScreenshotAs(OutputType.FILE);
File screenShotName = new File(System.getProperty("user.dir")+"/Screenshots/"+driver.getTitle()+"_"+".png");
FileUtils.copyFile(screenShot, screenShotName);

}
}

Now Create pages under com.selenium.portal.pages package, which will store all the web elements attributes means it'll work as Object Repository class, Like Below.

LoginPage.java

package com.selenium.portal.pages;
import org.openqa.selenium.WebElement;
import org.openqa.selenium.support.FindBy;
import org.openqa.selenium.support.PageFactory;
import com.selenium.portal.utility.WebdriverInstance;

public class Login extends WebdriverInstance {  
 
 //Using PageFactory model
 @FindBy(id="userNameId")
 static WebElement userName;
 
 @FindBy(id="passwordId")
 static WebElement password;
 
 @FindBy(id="submitID")
 static WebElement loginSubmit; 
 
 public Login() {
  PageFactory.initElements(driver, this);
 }
 
 public String validateLoginTitle() {   
  return  driver.getTitle();
 }
 
 public  void setUserName(String uName) {
  userName.sendKeys(uName);
  
 }
 public void setPassword(String passsword) {
  password.sendKeys(passsword);
 }
 
 public void clickOnLogin() {
  loginSubmit.submit();
 }

}


Now we need to write @Test under Com.selenium.portal.Tests package, Create a class and Name as LoginTest.Java, here we're writing all possible test cases based on Login.java class object repository class as below.

LoginTest.java

package com.selenium.portal.Tests;
import java.io.IOException;
import org.testng.Assert;
import org.testng.annotations.BeforeClass;
import org.testng.annotations.Test;
import com.aventstack.extentreports.Status;
import com.selenium.portal.pages.Login;
import com.selenium.portal.utility.WebdriverInstance;

public class LoginTest extends WebdriverInstance {
 
Login login;

@BeforeClass
public void setUp() throws IOException {
 openBrowser();
 takeScreenShot();
 login = new Login();
 
}

@Test(priority=1)
public void openAUTUrl() throws IOException {
 System.out.println("First Test");
 driver.get(property.getProperty("baseUrl"));
 takeScreenShot();
 
}

@Test(priority=2)
public void verifyPageTitleTest() {
 System.out.println("Second Test");
 test.log(Status.INFO, "Verifying the Page Title");
 String title = login.validateLoginTitle();
 Assert.assertEquals(title, property.getProperty("loginPage"));
 test.log(Status.PASS, "Login page title is matching with Expected Title");
 
}

@Test(priority=3)
public void loginTest() throws InterruptedException, IOException {
 System.out.println("Third Test");
 
 test.log(Status.INFO, "Entering Username and Password");
 System.out.println(property.getProperty("userName"));
 System.out.println(property.getProperty("passWord"));
 
 login.setUserName(property.getProperty("userName"));
 login.setPassword(property.getProperty("passWord"));
 Thread.sleep(5500);
 takeScreenShot();
 login.clickOnLogin();
 
}

@Test(priority=4)
public void userAccountTest() throws IOException {
 System.out.println("Fourth Test");
 
 test.log(Status.INFO, "Verify User Account screen is open");
 try {
  Thread.sleep(5500);
 } catch (InterruptedException e) {
  // TODO Auto-generated catch block
  e.printStackTrace();
 }
 
 String accountTitle = login.validatePageTitle();
 System.out.println(accountTitle);
 Assert.assertEquals(accountTitle, property.get("selectProgramTitle"));
 takeScreenShot();
 test.log(Status.PASS, "Select Program title is matching with Expected Title");
}

}

We'll run the Tests with the help of testng.xml file and testng.xml file is

Now Right click and run your testng.xml file and it'll start executing your all @Test method one by one.


Thank you for reading, if you like my post, please share with your friends and provide your valuable comments and don't forget to implement this model in your project.

Selenium WebDriver Scripting Guidelines

Learn Selenium scripting guidelines using real time examples, while implementing selenium Test scripts, Preparing Selenium framework using Java or any other language it is very important to follow some important selenium guidelines for scripting, follow below simple and important guidelines to prepare robust Selenium frameworks.

Selenium WebDriver Scripting Guidelines


1. Export Project as a JAR file


After creating Selenium Test Scripts for web application projects, just convert project into JAR file and it is easy to run without opening Eclipse IDE or any other tools, which you are using. Why JAR file means, in order to run your Selenium scripts across the different platforms such as windows, mac OS etc.

You can run Selenium project JAR file in command prompt as below

1.     Go to Project folder path where JAR file is exported
2.     Now Enter java -jar runnablejar.jar
3.     Hit Enter

It'll start executing your Test Scripts


2. Length of the Selenium Script:


Selenium Script should be identical, contains Test Cases, where it should not have any junk code and repeated lines of codes,by this you can know that your Test Script should have reusable code.You'can write Selenium script as per prepare test cases but should not contain any unusual code.

While preparing Selenium Scripts it is very important that your script should have dynamic test data not a static test data, You can use Test NG @Dataprovider annotation to read the test data from Xls file and use Apache POI library to read the test data  from xlsx files.


3. Finding UI Elements


As per Selenium Scripting Guidelines, We should not click directly on UI Elements because we should follow some steps before clicking on UI Elements, those are

1.     Wait for Element to Load
2.     Use condition to verify UI Element is enable or not using isEnable() method.
3.     Use Condition to Verify UI Elements are displaying or not using isDisplayed() method.
4.     Make sure UI Element is Clickable.
5.     Perform Click Action once Element is Clickable.

This is not at all Recommended


driver.findElement(By.xpath(//input[id='firstName']))

In above code we're directly clicking on UI Elements using Selenium test code but we're not providing any condition to verify whether Element is visible or not, Element is clickable or not. Just follow below sample code before identifying the Elements in UI.

Recommended Code:


WebDriverWait wait = new WebDriverWait(driver, 10);   
WebElement element = wait.until(ExpectedConditions.presenceOfElement(By.xpath("//input[id='firstName']"));
 (new Actions(driver)).moveToElement(element).perform();
wait.until(ExpectedConditions.elementToBeClickable(element);
element.click();

As per above code we're verifying the UI Element is present or not ,then we're performing Click Operation on UI Elements.

4. Main Method


It is always recommended to Run Selenium Test Scripts using main method, if you're using any Framework like TestNG, JUnit, Using simple code you can run your Selenium Scripts using TestNG OR JUnit Test cases under main method. So it is easy to convert your project into Runnable JAR file.

Example:

public static void main(String[] args) {                
                   TestListenerAdapter testla = new TestListenerAdapter();
                   TestNG testng = new TestNG();
                   testng.setTestClasses(new Class[]{SampleTests.class});
                   testng.run();
}

In Above main method I’m running TestNG @Test methods using simple Test script under main method, you people also can follow the same to run your Selenium Test Scripts.

By Above important Guidelines will make you from beginners to Expert level in Selenium Scripting, In case you like my Post, please share with your friends and provide your valuable comments on this Selenium Scripting Guidelines.

Mobile App Test Automation Methodology

Mobile App Testing have a well-recognized Mobile Test Automation Methodology. Mobile Test Automation Methodology has defined different phases and the key actions performed are mentioned below.

Test Automation Phases

Automation Requirement Analysis
Automation Test Planning
Automation Test Design
Test Script Development
Test Execution and Report Preparation

Also READ : 

Mobile APP Testing using APPIUM
Mobile APP Test Scripting Using Selenium

Automation Key Events

Determine Automation Objectives
Ideal Automation Team Members
Automation Traceability Matrix
Automation Tool Selection
Create Proof of Concept (POC)
Preparation of Automation Test Plan
Develop Automation Scripting
Finalize Automation Approach and Framework
Create Requirements into Automated Scripts
Creating Reusable / Module Functions
Test Script Generation
Test Scripts Dry Runs
Test Scripts Execution
Test Execution Reporting
Automation Metrics Collection

Automation Test Deliverable's

Test cases for automation
Automation Traceability Matrix.
Automation Approach
Automation Test Plan
Test Scripting Standards
Automation Test Framework
Test Automation Suite
Automation Test Results
Automation Test Reports
Automation Test Metrics

Run Selenium Script using runnable JAR

This Selenium WebDriver lesson explains how to convert a Selenium WebDriver scripts into a runnable JAR file. The JAR file can be uploaded to the any operating system platform to be run from many locations using JAR file.

We will first create the script using simple Java program using the TestNG test format, then create and verify script runnable aa a Java project using Eclipse Tool, and last build the project into as a runnable JAR file.

Pre Requisite

Selenium client libraries v 3.1 for Java, You can download from this website

I’m using Firefox 56 version

We require Geckodriver exe file to open Firefox Browser, without geckodriver it will not open Firefox browser.

Also READ: Open Firefox Browser using geckoDriver

Java Development Kit (JDK) 8: http://www.oracle.com/technetwork/java/javase/downloads/jdk8-downloads-2133151.html

Eclipse IDE for Java Developers: http://www.eclipse.org/downloads/

1. Create Eclipse Project

To create a new Java project in Eclipse, select File > New > Java Project from the Eclipse menu.


Specify the project name and location. Leave other options as is and click Finish.

Project Structure will look like below.


2. Now Add All required Selenium Libraries with the help of Build Configure Menu.

Right Click on Project - >Build Path -> Configure Build Path


Now Click on Libraries Tab ->Click on Add External Jars


Browse all Selenium related Jar files and Select to add JAR files 

Click on Add Library to add TestNG library

Select TestNG

Also READ : Write Test Cases PASS/FAIL Using Selenium

Click on Next and click on Finish button

Now Click on Apply and Close.


Next, create a package (namespace) for your Selenium test. To do that, right-click the project and select New > Package.

Enter the package name and click Finish.


Tip: Java package names should be all lowercase and begin with your company’s reversed Internet domain name.

3. Create Main Method

A runnable JAR needs a main method. Java code generated by Selenium does not include the main method, but it is easy to add it.

Edit your .java file and add these lines at the beginning of the file, after other imports:

Then, add this main method inside the class:

public static void main(String[] args) {

TestListenerAdapter testla = new TestListenerAdapter();
TestNG testng = new TestNG();
testng.setTestClasses(new Class[] {SampleTests.class});
testng.run();
}

The above code will execute all the @Test methods one by one,at last generates reports in test-output folder.

Complete Class Code:

package com.selenium.actions;
import java.io.IOException;
import org.openqa.selenium.WebDriver;
import org.openqa.selenium.firefox.FirefoxDriver;
import org.testng.ITestResult;
import org.testng.TestListenerAdapter;
import org.testng.TestNG;
import org.testng.annotations.AfterMethod;
import org.testng.annotations.Test;

public class SampleTests  {
WebDriver driver;


@Test
public void runnableJARTest() throws IOException, InterruptedException {

//Using Gecko Driver to Open Firefox Browser
System.setProperty("webdriver.gecko.driver", "F:\\Java_Applications\\Zip Files\\geckodriver-v0.16.0-win64\\geckodriver.exe");

driver= new FirefoxDriver();
driver.get(" https://learn-selenium-automation-testing.blogspot.in");

}

public static void main(String[] args) {

TestListenerAdapter testla = new TestListenerAdapter();
TestNG testng = new TestNG();
testng.setTestClasses(new Class[] {SampleTests.class});
testng.run();
}

@AfterMethod
public void afterTest(ITestResult results) {
if(results.isSuccess()) {
System.out.println("Test Cases is Pass");

}else if(results.getStatus()==ITestResult.FAILURE) {
System.out.println("Test Cases is FAIL");

}else if(results.getStatus()==ITestResult.SKIP) {
System.out.println("Test Cases is SKIPPED");
}
 
}

Now Right Click on Project -> Run As - > Java Application

It should execute above code without any errors, In case any errors then need to resolve the same for smooth execution of the code.

4. Export Project as Runnable JAR

To Export Your Project, right click on Project -> Export->Select Java - > Runnable JAR file


Click on Next

Select Launch Configuration as Your class – Project Name

Enter Export destination path with JAR name with .jar extension as below

E:\Automation_Testing\runnablejar.jar


Click on Finish button.

To confirm that the JAR file has been properly packaged, open the command prompt and run this command:

java -jar <path>\filename.jar

For example:

java -jar C:\Tests\AlertSiteSeleniumExample.jar

This will open Firefox browser and execute your Selenium Test script. You should see Test Results finished successfully in the Command Prompt console as below.


Please share this post with your friends and provide valuable comments on this post. Thank you for reading my Blog.