This Selenium WebDriver lesson explains how to convert a Selenium WebDriver scripts into a runnable JAR file. The JAR file can be uploaded to the any operating system platform to be run from many locations using JAR file.
We will first create the script using simple Java program using the TestNG test format, then create and verify script runnable aa a Java project using Eclipse Tool, and last build the project into as a runnable JAR file.
Pre Requisite
Selenium client libraries v 3.1 for Java, You can download from this website
I’m using Firefox 56 version
We require Geckodriver exe file to open Firefox Browser, without geckodriver it will not open Firefox browser.
Also READ: Open Firefox Browser using geckoDriver
Java Development Kit (JDK) 8: http://www.oracle.com/technetwork/java/javase/downloads/jdk8-downloads-2133151.html
Eclipse IDE for Java Developers: http://www.eclipse.org/downloads/
1. Create Eclipse Project
To create a new Java project in Eclipse, select File > New > Java Project from the Eclipse menu.
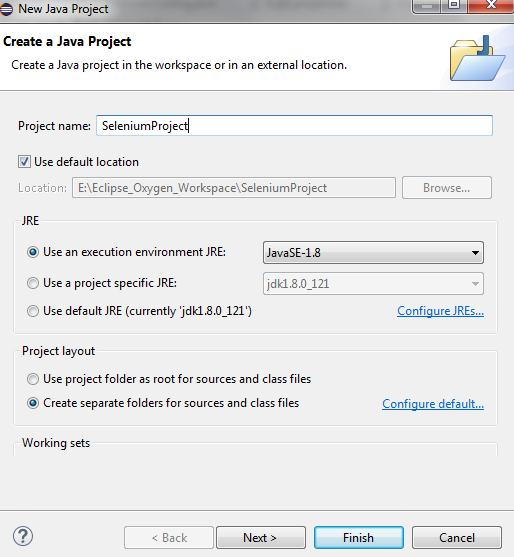
Specify the project name and location. Leave other options as is and click Finish.
Project Structure will look like below.

2. Now Add All required Selenium Libraries with the help of Build Configure Menu.
Right Click on Project - >Build Path -> Configure Build Path

Now Click on Libraries Tab ->Click on Add External Jars


Browse all Selenium related Jar files and Select to add JAR files
Click on Add Library to add TestNG library
Select TestNG
Also READ : Write Test Cases PASS/FAIL Using Selenium
Click on Next and click on Finish button
Now Click on Apply and Close.

Next, create a package (namespace) for your Selenium test. To do that, right-click the project and select New > Package.
Enter the package name and click Finish.

Tip: Java package names should be all lowercase and begin with your company’s reversed Internet domain name.
3. Create Main Method
A runnable JAR needs a main method. Java code generated by Selenium does not include the main method, but it is easy to add it.
Edit your .java file and add these lines at the beginning of the file, after other imports:
Then, add this main method inside the class:
public static void main(String[] args) {
TestListenerAdapter testla = new TestListenerAdapter();
TestNG testng = new TestNG();
testng.setTestClasses(new Class[] {SampleTests.class});
testng.run();
}
The above code will execute all the @Test methods one by one,at last generates reports in test-output folder.
Complete Class Code:
package com.selenium.actions;
import java.io.IOException;
import org.openqa.selenium.WebDriver;
import org.openqa.selenium.firefox.FirefoxDriver;
import org.testng.ITestResult;
import org.testng.TestListenerAdapter;
import org.testng.TestNG;
import org.testng.annotations.AfterMethod;
import org.testng.annotations.Test;
public class SampleTests {
WebDriver driver;
@Test
public void runnableJARTest() throws IOException, InterruptedException {
//Using Gecko Driver to Open Firefox Browser
System.setProperty("webdriver.gecko.driver", "F:\\Java_Applications\\Zip Files\\geckodriver-v0.16.0-win64\\geckodriver.exe");
driver= new FirefoxDriver();
driver.get(" https://learn-selenium-automation-testing.blogspot.in");
}
public static void main(String[] args) {
TestListenerAdapter testla = new TestListenerAdapter();
TestNG testng = new TestNG();
testng.setTestClasses(new Class[] {SampleTests.class});
testng.run();
}
@AfterMethod
public void afterTest(ITestResult results) {
if(results.isSuccess()) {
System.out.println("Test Cases is Pass");
}else if(results.getStatus()==ITestResult.FAILURE) {
System.out.println("Test Cases is FAIL");
}else if(results.getStatus()==ITestResult.SKIP) {
System.out.println("Test Cases is SKIPPED");
}
}
Now Right Click on Project -> Run As - > Java Application
It should execute above code without any errors, In case any errors then need to resolve the same for smooth execution of the code.
4. Export Project as Runnable JAR
To Export Your Project, right click on Project -> Export->Select Java - > Runnable JAR file

Click on Next
Select Launch Configuration as Your class – Project Name
Enter Export destination path with JAR name with .jar extension as below
E:\Automation_Testing\runnablejar.jar

Click on Finish button.
To confirm that the JAR file has been properly packaged, open the command prompt and run this command:
java -jar <path>\filename.jar
For example:
java -jar C:\Tests\AlertSiteSeleniumExample.jar
This will open Firefox browser and execute your Selenium Test script. You should see Test Results finished successfully in the Command Prompt console as below.

Please share this post with your friends and provide valuable comments on this post. Thank you for reading my Blog.
We will first create the script using simple Java program using the TestNG test format, then create and verify script runnable aa a Java project using Eclipse Tool, and last build the project into as a runnable JAR file.
Pre Requisite
Selenium client libraries v 3.1 for Java, You can download from this website
I’m using Firefox 56 version
We require Geckodriver exe file to open Firefox Browser, without geckodriver it will not open Firefox browser.
Also READ: Open Firefox Browser using geckoDriver
Java Development Kit (JDK) 8: http://www.oracle.com/technetwork/java/javase/downloads/jdk8-downloads-2133151.html
Eclipse IDE for Java Developers: http://www.eclipse.org/downloads/
1. Create Eclipse Project
To create a new Java project in Eclipse, select File > New > Java Project from the Eclipse menu.
Specify the project name and location. Leave other options as is and click Finish.
Project Structure will look like below.
2. Now Add All required Selenium Libraries with the help of Build Configure Menu.
Right Click on Project - >Build Path -> Configure Build Path
Now Click on Libraries Tab ->Click on Add External Jars


Browse all Selenium related Jar files and Select to add JAR files
Click on Add Library to add TestNG library
Select TestNG
Also READ : Write Test Cases PASS/FAIL Using Selenium
Click on Next and click on Finish button
Now Click on Apply and Close.

Next, create a package (namespace) for your Selenium test. To do that, right-click the project and select New > Package.
Enter the package name and click Finish.

Tip: Java package names should be all lowercase and begin with your company’s reversed Internet domain name.
3. Create Main Method
A runnable JAR needs a main method. Java code generated by Selenium does not include the main method, but it is easy to add it.
Edit your .java file and add these lines at the beginning of the file, after other imports:
Then, add this main method inside the class:
public static void main(String[] args) {
TestListenerAdapter testla = new TestListenerAdapter();
TestNG testng = new TestNG();
testng.setTestClasses(new Class[] {SampleTests.class});
testng.run();
}
The above code will execute all the @Test methods one by one,at last generates reports in test-output folder.
Complete Class Code:
package com.selenium.actions;
import java.io.IOException;
import org.openqa.selenium.WebDriver;
import org.openqa.selenium.firefox.FirefoxDriver;
import org.testng.ITestResult;
import org.testng.TestListenerAdapter;
import org.testng.TestNG;
import org.testng.annotations.AfterMethod;
import org.testng.annotations.Test;
public class SampleTests {
WebDriver driver;
@Test
public void runnableJARTest() throws IOException, InterruptedException {
//Using Gecko Driver to Open Firefox Browser
System.setProperty("webdriver.gecko.driver", "F:\\Java_Applications\\Zip Files\\geckodriver-v0.16.0-win64\\geckodriver.exe");
driver= new FirefoxDriver();
driver.get(" https://learn-selenium-automation-testing.blogspot.in");
}
public static void main(String[] args) {
TestListenerAdapter testla = new TestListenerAdapter();
TestNG testng = new TestNG();
testng.setTestClasses(new Class[] {SampleTests.class});
testng.run();
}
@AfterMethod
public void afterTest(ITestResult results) {
if(results.isSuccess()) {
System.out.println("Test Cases is Pass");
}else if(results.getStatus()==ITestResult.FAILURE) {
System.out.println("Test Cases is FAIL");
}else if(results.getStatus()==ITestResult.SKIP) {
System.out.println("Test Cases is SKIPPED");
}
}
Now Right Click on Project -> Run As - > Java Application
It should execute above code without any errors, In case any errors then need to resolve the same for smooth execution of the code.
4. Export Project as Runnable JAR
To Export Your Project, right click on Project -> Export->Select Java - > Runnable JAR file

Click on Next
Select Launch Configuration as Your class – Project Name
Enter Export destination path with JAR name with .jar extension as below
E:\Automation_Testing\runnablejar.jar

Click on Finish button.
To confirm that the JAR file has been properly packaged, open the command prompt and run this command:
java -jar <path>\filename.jar
For example:
java -jar C:\Tests\AlertSiteSeleniumExample.jar
This will open Firefox browser and execute your Selenium Test script. You should see Test Results finished successfully in the Command Prompt console as below.

Please share this post with your friends and provide valuable comments on this post. Thank you for reading my Blog.
No comments:
Post a Comment