How to launch and Stop Appium programmatically

How to launch and Stop Appium programmatically, How to start appium server programmatically using java code, There are different ways to start Appium server, every time starting manually would become time consuming process for testing approach, we can start using command line as well as using java program. In this lesson let us focus on How to start appium server using java program with very simple example. Many Software Testers working on GUI based Appium Server versions, Using GUI based Appium Tool easy to launch just click on Run icon, then it will start Appium Server as well as easy to stop the server by click on Stop icon but it is recommended to start or launch your Appium server using non GUI mode using Java programmatically for ease of use and easy to control while test execution.

Also Read : Start Learning APPIUM

How to launch and Stop Appium programmatically


We can start appium server and stop appium service using program with the help of below lines of codes.

For Start Apium Service = appiumservice.start() Before Test cases execution starts.
For Stop Appium Service = appiumservice..stop() Once Test Execution completes,which will stop the service.


How to launch and Stop Appium programmatically


In order to perform above task we require Appium Java Client i.e "AppiumDriverLocalService" class which extends Selenium Remote Service Driver Class to get start and stop methods.

public final class AppiumDriverLocalService extends org.openqa.selenium.remote.service.DriverService

Also Read: Selenium Grid APPIUM Configuration

AppiumServiceBuilder : This class is useful in build Appium Service,which is useful in set Server Address,port number,desired capabilities etc before starting the appium service.

Simple Implementation:

Below is the simple code to start and stop the Appium service using AppiumDriverLocalService  class

AppiumDriverLocalService driverService = AppiumDriverLocalService.buildDefaultService();
driverService.start();
//To Stop the service
driverService.stop();

Pre Requisites:

1.Appium Should be installed
2.Node js should be installed
3.commons-lang3-3.7 jar should be added to build path
4.commons-validator-1.6 should be added to build path


Complete Appium Program:

package com.android.testing;
import java.io.File;
import org.openqa.selenium.remote.DesiredCapabilities;
import org.testng.annotations.AfterClass;
import org.testng.annotations.BeforeClass;
import org.testng.annotations.Test;
import io.appium.java_client.service.local.AppiumDriverLocalService;
import io.appium.java_client.service.local.AppiumServiceBuilder;
import io.appium.java_client.service.local.flags.GeneralServerFlag;


public class AppiumService {

private AppiumDriverLocalService appiumService;
private DesiredCapabilities capabilities;
private AppiumServiceBuilder builder;
String node_js_Path="C:\\Program Files (x86)\\Appium\\node.exe";

@BeforeClass
public void startServer(){

//Set Capabilities
capabilities = new DesiredCapabilities();
capabilities.setCapability("AppiumserviceReset", false);

//Lets Build the Appium Service
builder = new AppiumServiceBuilder();
builder.usingDriverExecutable(new File(node_js_Path));
builder.withAppiumJS(new File("C:\\Program Files (x86)\\Appium\\node_modules\\appium\\bin\\appium.js"));
builder.withArgument(GeneralServerFlag.LOG_LEVEL,"info");
builder.usingAnyFreePort();
builder.withIPAddress("127.0.0.1");

//Now start the service
appiumService = AppiumDriverLocalService.buildService(builder);
appiumService.start();
}

@AfterClass
public void stopAppiumService(){
appiumService.stop();
}
@Test
public void checkAppiumService(){
System.out.println("Testing Appium Service");
}

}


Once you execute the code your Appium service will start on provided ip address and it'll display results in console as below and provide your valuable comments on this posts and please share with your friends.

Test Results:

[RemoteTestNG] detected TestNG version 6.9.6
[TestNG] Running:
  C:\Users\307980\AppData\Local\Temp\testng-eclipse-735127911\testng-customsuite.xml

[36minfo[39m: Welcome to Appium v1.4.13 (REV c75d8adcb66a75818a542fe1891a34260c21f76a)
[36minfo[39m: Appium REST http interface listener started on 127.0.0.1:14179
[36minfo[39m: Console LogLevel: info
[36minfo[39m: [37m-->[39m [37mGET[39m [37m/wd/hub/status[39m [90m{}[39m
[36minfo[39m: [37m<-- GET /wd/hub/status [39m[32m200[39m[90m 18.825 ms - 105[39m [90m{"status":0,"value":{"build":{"version":"1.4.13","revision":"c75d8adcb66a75818a542fe1891a34260c21f76a"}}}[39m
Testing Appium Service
PASSED: checkAppiumService

===============================================
    Default test
    Tests run: 1, Failures: 0, Skips: 0
===============================================


===============================================
Default suite
Total tests run: 1, Failures: 0, Skips: 0
===============================================
Selenium Grid Appium configuration Example

Selenium Grid Appium configuration Example,Connecting appium server to selenium grid for android Testing,Learn APPIUM for android Testing,while working with Appium for android testing using Selenium Grid  we'll face one issue like how to connect to appium server to selenium grid why because Selenium Grid is creating nodes in different machines to run Selenium Scripts in multiple operating systems.

Selenium Grid Appium configuration Example Steps:

Please follow below simple steps to resolve the problem while working with Selenium Grid+Appium.I have configured appium with selenium grid in my test environment using below simple tests.

1.Open Appium
2.Go to General Settings.
3.Enter Server Ip and port.
4.You'll see option like "Selenium Grid Configuration File",just select the check box.


Selenium Grid Appium configuration Example
Your Configuration file will looks like below and save it in json xml format

In the node config file you've to mentin the browserName, version and platform details and based on these parameters the grid will re-direct tests to the proper device. You've to configure host details and the selenium grid details. For a full list of all parameters and descriptions below chec below file,Once you starts the Appium server and it'll register with the grid, you will see your device on the grid console page:


{
  "capabilities":
      [
        {

          "browserName": "<e.g._device Name",
          "version":"<version_of_Android/IOS_e.g._6.0>",
          "maxInstances": 1,
          "platform":"<platform_e.g.ANDROID>"
        }

      ],

  "configuration":

  {

    "cleanUpCycle":3000,
    "timeout":30000,
    "proxy": "org.openqa.grid.selenium.proxy.DefaultRemoteProxy",
    "url":"http://<host name appium server or ip-address appium server>:<appium_port>/wd/hub",
    "host": <host_name_appium_server_or_ip address appium server>,
    "port": <appium_port>,
    "maxSession": 1,
    "register": true,
    "registerCycle": 5000,
    "hubPort": <grid_port>,
    "hubHost": "<Grid hostname(or) grid ipaddress>"
  }

}

1.Create Nodes in required Machines
2.Need to Start new Nodes for each device as you've configured in different machines. 3.Register those nodes with Selenium Grid Server.
4.Now Start the Server using java -jar selenium-server-standalone-2.43.0.jar -role hub
5.You can register the nodes with this command  - appium -p -U --nodecofig 

  Simple nodeConfig json File


  {
  "capabilities":

      [

        {

          "browserName": "device Name",
          "version":"6.0",
          "maxInstances": 1,
          "platform":"ANDROID"

        }

      ],

  "configuration":
  {

    "cleanUpCycle":3000,
    "timeout":30000,
    "proxy": "org.openqa.grid.selenium.proxy.DefaultRemoteProxy",
    "url":"http://127.0.0.1:4723/wd/hub",
    "host": 127.0.0.1,
    "port": 4723,
    "maxSession": 1,
    "register": true,
    "registerCycle": 5000,
    "hubPort": 4789,
    "hubHost": "10.98.45.789"
  }

}


I think you'got enough information on How to Connect appium server to selenium grid topic,in case you'lie my post,please provide your valuable comment and share with your friends.Than you for reading my blog posts.

Run Selenium Webdriver Scripts using Command Line

Welcome to Selenium Tutorials, today we will learn Run Selenium Webdriver Scripts using Command Line with examples.After creating Selenium script in Eclipse,you can run easily
but it is not recommended every time because in case you want to run on client machine then it is recommended to use command prompt instead of opening eclipse and right click and run.


Before executing Selenium Test Scripts from command line then you should've selenium setup in your machine, still not done then follow the below link and complete the setup.

Selenium Webdriver Setup

Once you start designing Selenium Test cases Scripting continuously your Test Cases count will increase, so you've to manage your test cases accordingly. TestNG framework providing very helpful concept of creating testng.xml file based on requirement and put all relevant test classes inside the testng.xml file and run it as a Test Suite.

Trending Posts:

Write TestCase PASS/FAIL In Excel using Selenium
Solution - Testng Cannot Find ClassPath Error
Generate HTML Reports using Selenium
Webdriver Instance to Multiple Classes

Pre Requisites-

1- TestNG should be installed inEclipse.
2- testng xml file should be created.
3- Class-path should be set.

Run Selenium Webdriver Scripts using Command Line

Src - the .java files can be found here
Bin - the .class files will be generated here

Step 1- Create testng.xml files and store all xml into project home directory as given below.


<?xml version="1.0" encoding="UTF-8"?>
<!DOCTYPE suite SYSTEM "http://testng.org/testng-1.0.dtd">
<suite name="Selenium Test Suite">
    <listeners>
        <listener class-name="org.uncommons.reportng.HTMLReporter"/>
        <listener class-name="org.uncommons.reportng.JUnitXMLReporter"/>       
    </listeners>
  <test name="SeleniumRegressionTest">
    <classes>
      <class name="com.sel.Selenium.Practise.GoogleSite"/>
    </classes>
  </test>
</suite>


Step 2- Set classpath now

Important points to remember-

1-Put all the jars (Selenium jars) into separate folder and  put that folder into project home directory.

I've created Lib folder and pasted all required jars inside a folder ,downloaded from Selenium website.

Refer below screenshot of Lib folder with required jar files.

2- Open command prompt and type E: and press enter because my project work Space in E drive.


Now go to project home directory for this type directory path and enter as below


Run Selenium Webdriver Scripts using Command Line

Now we can set classpath for this,specify bin folder.

Home Directory > set classpath=Home Directory\bin; and press enter

Specify lib folder where all jars is available

Home Directory > set classpath=Home Directory\lib\*; and press enter

Step 3-Now run xml file using below command

Home-directory > java org,testng.TestNG testng1.xml and hit enter


Other wise you can run in single step as below command.

Go to Project Folder path in Command Line.
Enter below command in command line and hit enter.


java -cp E:\QTPTutorials\Selenium_Workspace\Selenium_Tutorials\Lib\*;E:\QTPTutorials\Selenium_Workspace\Selenium_Tutorials\bin org.testng.TestNG testng.xml


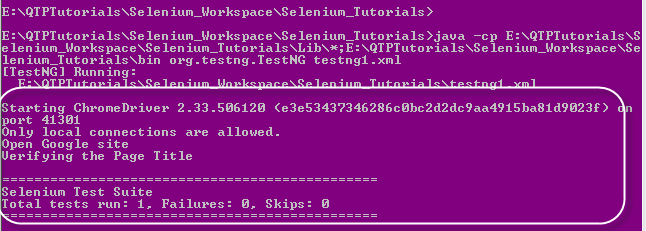
Test Results:

Run Selenium Webdriver Scripts using Command Line
Test Results


Thanks for visiting my blog. If you find this post informative then please share with your friends and provide your valuable comments on this post.

Cross Browser Testing using Selenium WebDriver

Cross Browser Testing using Selenium WebDriver to run Test Scripts in different browsers like Google Chrome,Firefox ,Internet Explorer etc at a same time then we have to use TestNG Framework for Automating Cross Browser Testing using Selenium WebDriver.

What is Cross Browser Testing?

Cross Browser Testing means testing the application under test(AUT) with different browsers in order to verify all functionalities are working same in all browsers.


Problems if not done Cross Browser Testing

1.Main defect is Design issue.
2.Some functionalities not supports javascript because of browser
3.Some functionalities will not work in some browsers because of configurations.
4.Some time facing issues while uploading/Downloading file formats.
5.Faacing the problems with additional plugins like displaying grid details in applications.
6.Some functionalities will not work changing the campatability mode in browsers.

In order to over come above some problems we have to perform Cross Browser Testing for applications under test(AUT).

Pre-Requisites

1.testng.xml
2.Different browsers drivers(IE Driver,Chrome Driver etc).
3.Test Script class for test cases.
4.Declaring the browsers in a class.
5.@Parameters annotation which Describes how to pass parameters to a @Test method,where we are writing our Test Cases  i.e Test Scripts.

Example for Cross Browser Testing

Prepare textng.xml file to set up parameters for different browsers,follow same code as below.


<?xml version="1.0" encoding="UTF-8"?>
<!DOCTYPE suite SYSTEM "http://testng.org/testng-1.0.dtd">
<suite name="Cross Browser Testing" preserve-order="true" verbose="2" parallel="tests">  
<parameter name="Weburl" value="http://www.google.com"></parameter>  
<test name="Internet Explorer">
<parameter name="WebBrowser" value="ie"></parameter>
<classes>
<class name="com.wiki.wiki.Cross"/>
</classes>
</test>
<test name="Google Chrome">
<parameter name="WebBrowser" value="chrome"></parameter>
<classes>
<class name="com.wiki.wikishown.Cross"/>
</classes>
</test>
<test name="Firefox">
<parameter name="WebBrowser" value="firefox"></parameter>
<classes>
<class name="com.wiki.wikishown.Cross"/>
</classes>
</test> 
</suite> 

Now create two classes one class is for driver initialization and Browser setting and second clas is for Test Scripts under @Test anotaitions,follow below classes
Create SelDriver.java class to initialize the driver and browsers set up as below

package com.wiki.seln;
import java.util.concurrent.TimeUnit;
import org.openqa.selenium.WebDriver;
import org.openqa.selenium.chrome.ChromeDriver;
import org.openqa.selenium.firefox.FirefoxDriver;
import org.openqa.selenium.ie.InternetExplorerDriver;
import org.testng.annotations.AfterTest;
import org.testng.annotations.BeforeTest;
import org.testng.annotations.Parameters;

public class SelDriver {
public static WebDriver driver;
static String baseUrl;

@BeforeTest
@Parameters("WebBrowser")
public void setup(String WebBrowser){

//Adding verfication point using IF Condition
if(WebBrowser.equalsIgnoreCase("firefox")){
driver = new FirefoxDriver();

}else if(WebBrowser.equalsIgnoreCase("ie")){

//For ie browser we have to use System.SetProperty
System.setProperty("webdriver.ie.driver", "F:\\Java_Applications\\Zip Files\\IEDriverServer.exe");
driver = new InternetExplorerDriver();

}else if(WebBrowser.equalsIgnoreCase("chrome")){
//For Google chrome browser we have to use System.setProperty and Chrome Driver
System.setProperty("webdriver.chrome.driver", "F:\\Java_Applications\\Zip Files\\chromedriver.exe");
driver = new ChromeDriver();

}
//Maximize the windows of all browsers
driver.manage().window().maximize();

}
@AfterTest
public void tearDown(){
driver.manage().timeouts().implicitlyWait(30, TimeUnit.SECONDS);

}

}

Now i am using Wikishown class and using inheritance wit the help of extends keyword as below

package com.wiki.seln;
import java.util.concurrent.TimeUnit;
import org.openqa.selenium.By;
import org.testng.annotations.Parameters;
import org.testng.annotations.Test;

public class Cross extends SelDriver {

@Test(priority=1)
@Parameters("Weburl")
public void testMethod(String Weburl){

//Navigate to URL and Weburl is taking from testng.xml file
driver.navigate().to(Weburl);
//wait until page loads
driver.manage().timeouts().implicitlyWait(30, TimeUnit.SECONDS);
driver.findElement(By.liknText("Manual Testing")).click();
driver.manage().timeouts().implicitlyWait(40, TimeUnit.SECONDS);
driver.findElement(By.linkText("Selenium")).click();

}

}

Above in two classes i have used @Parameters annotation to call parameter name from xml file.Now run xml file as run as -- TestNG Suite then it will run all @Test methods in a class and displays test execution results in Console as well as Test NG icon.

Top Selenium Interview Questions and Answers asked in MNC companies

I am giving most top Selenium Interview Questions and Answers asked in MNC companies,which will helps you to get job in companies as Selenium Automation tester with Selenium WebDriver questions also.Please read it carefully until end questions and practice coding as i have given (Interview Questions) ,this questions are asked in my interview.

1.What is Selenium Webdriver?

Selenium is a open source automation testing tool which is used to test web applications,it's not support desktop means windows applications.Selenium support for 
n tier environment ,it support many programming languages those are Java,ruby,python,C# etc.Selenium supports all different browsers i.e Google Chrome,FireFox ,Internet Explorer,
Opera,Safari etc.

2.What are the components of Selenium?

Selenium is a package which will have Selenium IDE , Selenium RC(Selenium 1),Selenium Grid , Selenium WebDriver.Selenium IDE is a Firefox addon i.e plugin simply download
Selenium IDE plug in from firefox addons which is used for record and playback the application under test.

3.What is the use of Selenium IDE as record and Playback?

Selenium IDE is a firefox plugin which is used to record and playback the scripts in order to learn the selenium scripts easily with different languages.
Recorded script can convert Java,ruby,python etc languages in Selenium IDE,it has most useful commands which is useful in verification purpose.

4.What is the difference Between Selenium RC and Selenium Web Driver?

Selenium RC is a Selenium Remote Control which is used to test the application under test where we have to start the server each time before test excution.
Selenium Web driver which is not require any server to start before execution of test scripts application under test.
Selenium RC is a semi object oriented tool where Selenium web driver is a fully object oriented tool.
Selenium RC doesn't support listeners
Selenium Webdriver supports listeners for implementation on test scripts.

5.What are the problems you faced while testing with Selenium?

As per the question most of the people explain about exception faced while test script execution like Nosuch elements present etc.But here question indicates that
selenium limitations those are

1.Selenium doesn't support captha/Barcode functionalities.
2.Selenium doesn't support java applets
3.Selenium doesn't support mobile applications testing.
4.Selenium doesn't have inbuilt Reports generation for Test Results.We have to use for third party plugins.
5.In case face any problems need to communicate with Selenium community in order to resolve the problems ,there is no other communities to proper help.
6.For creating test cases we have to use for JUNIT or TEST NG framework ,there no built in frameworks. 
7.Tester should have any programming language.ex:java,ruby,python,php etc.

6.How you will handle AJAX controls using Selenium?

Ajax controls means loading ,waiting icons when we search the data it is taking some time to diaply results from the database at that time we will see icons as please wait,loading.
This type of ajax loading we can control by Implicit wait or Thread.Sleep()
Ex: driver.manage().timouts().implicitWait(30,Timunits.SECONDS);
eX:Thread.Sleep(3500) means 3.5 seconds

7.What is the difference between Thread.Sleep() and implicitwait()?

Both are wait types which will perform same operations or actions in test scripts but it has some major difference i.e Implicit wait only works first of the test script execution
but Thread.Sleep() will work every time you execute the script.It will wait untill thread.sleep(2500) 2.5 seconds but implicit wait will wait first time then second tim eonwards it will
not wait properly because i have faced same problem in script execution,this one i have observed closely.Implicit wait is wait untill time specific but some times it will not work as expected.

8.What is Assert in Selenium?

Assert is a verification point in Selenium which is used to verify the condition in Test script but Assert execute the test results untill it get success but once test case is fail
then it will stop test excution in selenium.

Example: 
String baseball = "10"
Assert.asserttrue(baseball.isEvenNumber(10));

9.What is Verify in Selenium ? 

Verify is a verification point in selenium which is helpful in verify the condition in Test script ,where verify execute the test cases in case it is fail or pass.It will not stop the
test excution if test case is fail.

Example:
VerifyTestPresent();
try {
      assertEquals(driver.getTitle(), "Google");
    } catch (Error e) {
      verificationErrors.append(e.toString());
    }

10.What are the different locators in Selenium?

Locators is used to identify the objects in Webpages just like Properties of web elements.In Selenium different types of Locators are present those are

1.ID
2.Name
3.ClassName
4.Xpath : Xpath is a XML path (Extendable Markup Language)
5.tagname : Ex: for link 'a'
6.LinkText : Ex: Home
7.Css selectors
8.DOM
9.PartialLinkText

11.How to count links in a webpage using Selenium?

In order to count the links of webpage we will use below script.

@Test
public void links(){

driver.get("http://www.google.co.in");
List<WebElement> alllinks = (List<WebElement>) driver.findElements(Bi.tagName("a"))

int countlinks=alllinks.size();
System.out.println("Total Number of links in a Webpage is :"+countlinks);

}

Output Is:
Total Number of links in a Webpage is : 176

12.How to find element is displayed on screen?

We can use isDisplayed() method to verify element is displayed in a webpage as below example.

public class example{

public static void main(String[] args){

WebDriver driver = new FirefoxDriver();
driver.get("http://www.wikishown.com");
String textele = driver.findElement(By.LinkText("All Questions"));

if(textele.isDisplayed()){
driver.findElement(By.LinkText("All Questions")).Click();
System.out.println("All Questions link is displayed in a webpage");

}else{
System.out.println("All Questions link is not displayed in a webpage");
}

}

}

13.How to handle alerts in a Selenium?

Alerts in a webpage can be handle by below code

Alert alert = driver.switchTo().alert();
alert.accept();


14.How to handle Frames in a selenium ? 

Frames in a webpage can be handle by three methods those are

1.Frame(int args); Selecting a frame with its index number i.e in case one webpage has more than one frame then first frame will be at index 0, and second  fraame at index 1.
2.Frame(String args);Here we can select a frame using name or id of particular frames.
3.Frame(WebElement args);

15.How to handle Mouse hover using Selenium ? 

Most of the time in our applications mouse hover menus would be there for examples My Account etc.Let's see the details below
We can use Actions method and WebElement to handle mouse hover in a webpage .

Example:

@Test
public void mousehove(){
driver.get("http://www.wikishown.com");
Thread.sleep(2500);
//Using Actions method

Actions action = new Actions();
WebElement element = driver.findElement(By.id("name"));
action.moveToElement(element).build()action;
action.perform();
action.click();
}

Appium Introduction

Appium is an open source free Automation Mobile App Tool.Automate Native apps, Hybrid  apps and Mobile Web browser Automation.Drives Android , IOS and Windows based Apps.With the help of WebDriver Protocol. Appium is a Cross Platform ,you can write the test scripts against Multiple Platforms with the same API,IOS + ANDROID + WINDOWS.

Appium Introduction:


Before jump into Appium Introduction,we should learn some concepts about Mobile Apps types in the market.Three types of Mobile Apps are their in market,those are

Native Apps : Developed using IOS , Android & Windows SDK Platforms.
Examples : Facebook , What’s Up , Times of India etc.

Hybrid Apps : Hybrid apps are part of Native Apps and Web Apps , it is a wrapper of web View.Hybrid apps build wrapper for already developed Web Sites.
Example : Blogger

Web Apps : Works in Web Browsers and implemented by HTML 5 .

Appium Supported Frameworks:

iOS Platform : Apple’s UIAutomation
Android 4.2+ Platform : Google’s UiAutomator
Android 2.3+ Platform : Google’s Instrumentation - Selendroid 
Windows: Microsoft’s WinAppDriver.

Appium System Requirements:

JDK should be installed
Set JAVA_HOME
Install Android SDK
Node JS
PDA .net for phone connectivity(in phone and Computer)
Emulators

Appium Limitations:

Less than Android version 17 will not work
In IOS script will execution time is more.
Limit Supports for Gestures
Not supports for Toast Messages.

Supported Languages:

Java
JavaScript
PHP
Python
Ruby

Please provide your valuable comments on this post.Thank you for reading My blog posts.