Welcome to Selenium Tutorials, today we will learn Run Selenium Webdriver Scripts using Command Line with examples.After creating Selenium script in Eclipse,you can run easily
but it is not recommended every time because in case you want to run on client machine then it is recommended to use command prompt instead of opening eclipse and right click and run.
Before executing Selenium Test Scripts from command line then you should've selenium setup in your machine, still not done then follow the below link and complete the setup.
Selenium Webdriver Setup
Once you start designing Selenium Test cases Scripting continuously your Test Cases count will increase, so you've to manage your test cases accordingly. TestNG framework providing very helpful concept of creating testng.xml file based on requirement and put all relevant test classes inside the testng.xml file and run it as a Test Suite.
Trending Posts:
Write TestCase PASS/FAIL In Excel using Selenium
Solution - Testng Cannot Find ClassPath Error
Generate HTML Reports using Selenium
Webdriver Instance to Multiple Classes
Pre Requisites-
1- TestNG should be installed inEclipse.
2- testng xml file should be created.
3- Class-path should be set.
Bin - the .class files will be generated here
Step 1- Create testng.xml files and store all xml into project home directory as given below.
Step 2- Set classpath now
Important points to remember-
1-Put all the jars (Selenium jars) into separate folder and put that folder into project home directory.
I've created Lib folder and pasted all required jars inside a folder ,downloaded from Selenium website.
Refer below screenshot of Lib folder with required jar files.
2- Open command prompt and type E: and press enter because my project work Space in E drive.
Now go to project home directory for this type directory path and enter as below
Now we can set classpath for this,specify bin folder.
Home Directory > set classpath=Home Directory\bin; and press enter
Specify lib folder where all jars is available
Home Directory > set classpath=Home Directory\lib\*; and press enter
Step 3-Now run xml file using below command
Home-directory > java org,testng.TestNG testng1.xml and hit enter
Other wise you can run in single step as below command.
Go to Project Folder path in Command Line.
Enter below command in command line and hit enter.
Thanks for visiting my blog. If you find this post informative then please share with your friends and provide your valuable comments on this post.
but it is not recommended every time because in case you want to run on client machine then it is recommended to use command prompt instead of opening eclipse and right click and run.
Before executing Selenium Test Scripts from command line then you should've selenium setup in your machine, still not done then follow the below link and complete the setup.
Selenium Webdriver Setup
Once you start designing Selenium Test cases Scripting continuously your Test Cases count will increase, so you've to manage your test cases accordingly. TestNG framework providing very helpful concept of creating testng.xml file based on requirement and put all relevant test classes inside the testng.xml file and run it as a Test Suite.
Trending Posts:
Write TestCase PASS/FAIL In Excel using Selenium
Solution - Testng Cannot Find ClassPath Error
Generate HTML Reports using Selenium
Webdriver Instance to Multiple Classes
Pre Requisites-
1- TestNG should be installed inEclipse.
2- testng xml file should be created.
3- Class-path should be set.
Run Selenium Webdriver Scripts using Command Line
Src - the .java files can be found hereBin - the .class files will be generated here
Step 1- Create testng.xml files and store all xml into project home directory as given below.
<?xml version="1.0" encoding="UTF-8"?>
<!DOCTYPE suite SYSTEM "http://testng.org/testng-1.0.dtd">
<suite name="Selenium Test Suite">
    <listeners>
        <listener class-name="org.uncommons.reportng.HTMLReporter"/>
        <listener class-name="org.uncommons.reportng.JUnitXMLReporter"/>
    </listeners>
  <test name="SeleniumRegressionTest">
    <classes>
      <class name="com.sel.Selenium.Practise.GoogleSite"/>
    </classes>
  </test>
</suite>
Step 2- Set classpath now
Important points to remember-
1-Put all the jars (Selenium jars) into separate folder and put that folder into project home directory.
I've created Lib folder and pasted all required jars inside a folder ,downloaded from Selenium website.
Refer below screenshot of Lib folder with required jar files.
2- Open command prompt and type E: and press enter because my project work Space in E drive.
Now go to project home directory for this type directory path and enter as below
 |
| Run Selenium Webdriver Scripts using Command Line |
Now we can set classpath for this,specify bin folder.
Home Directory > set classpath=Home Directory\bin; and press enter
Specify lib folder where all jars is available
Home Directory > set classpath=Home Directory\lib\*; and press enter
Step 3-Now run xml file using below command
Home-directory > java org,testng.TestNG testng1.xml and hit enter
Other wise you can run in single step as below command.
Go to Project Folder path in Command Line.
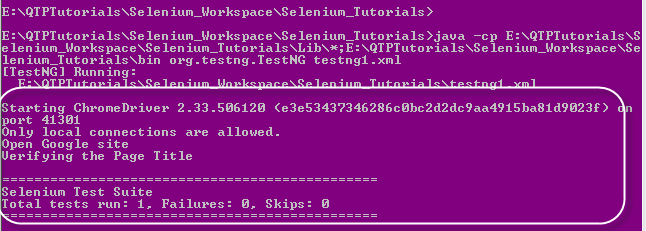
Enter below command in command line and hit enter.
java -cp E:\QTPTutorials\Selenium_Workspace\Selenium_Tutorials\Lib\*;E:\QTPTutorials\Selenium_Workspace\Selenium_Tutorials\bin org.testng.TestNG testng.xml
Test Results:
 |
| Test Results |
Thanks for visiting my blog. If you find this post informative then please share with your friends and provide your valuable comments on this post.


No comments:
Post a Comment